

Configuring Zoiper softphone on your computer allows you to talk using your myPBX phone extension.
We have an article to help you install Zoiper on your computer and also information on how to create a PBX extension.
Step 1 – Browse your phone extension information before configuring zoiper
After login into the Control Panel go to Settings -> Set Phone Extension and click on the desired phone extension. Now go to the Instructions tab to see the phone extension info:

Step 2 – Launch Zoiper to begin configuration
After opening Zoiper, type your extension information as follows:

Step 3 – SIP Server info
Type your SIP Server information and click on Next button.

Step 4 –Optional Proxy information
Only if you’re using a proxy in your network, please add the corresponding information, otherwise to continue configuring zoiper just click on Skip.

Step 5 – Wait for the Zoiper test to conclude
If the test fails you’ll see a message that says “Something went wrong” similar to this:

The possible causes of this error are:
- You’ve made a mistake when entering your username, password and/or sip server address, please go back and verify them.
- If you copy & paste the information from your browser, it’s possible that some special characters that you cannot see were copied. To avoid this issue, open the Notepad on your computer and paste the information in there. Now, copy the information from the Notepad and paste it to Zoiper.
- If you continue with the same error, please verify with your network administrator or Internet provider that your Internet network has the required ports to connect to myPBX open.
If the test is successful, at the end of the test Zoiper should have found SIP UDP connection, click on Next.

Step 6 – Optional Audio Settings
Depending on your computer features, configuring Zoiper software may ask you to do an audio configuration using a Wizard.
Please notice that if you’re using a computer with no integrated microphone, make sure you plug in the Headset you’ll use to talk in your computer.
Just follow the steps in there to successfully configure your audio options.

Step 7 – Your Phone extension is working
Now you can see your phone extension connected to Zoiper with a green check.
Wait you’re not done yet, please continue reading.

Step 8 – Verify your audio settings
Before doing calls, it’s advisable to verify that your audio settings are correct. The information displayed it’s just an example since it will change depending on your computer and headset hardware.
8.1 Click on the gear icon to open Zoiper settings

8.2 On the Settings menu, under Media click Audio

8.3 Verify that your audio devices are set as follows:

Step 9 – Verify that Zoiper starts with your Computer
It’s advisable to make Zoiper run when you start your computer, that way you won’t miss calls for not having the application opened when you turn on or reboot your computer.
9.1 On the Settings click on Automation
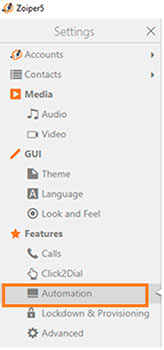
9.2 Check the option labeled “Start Zoiper with the operating system”

9.3 Close settings

You’re all set! Now you can use Zoiper with your myPBX phone extension.